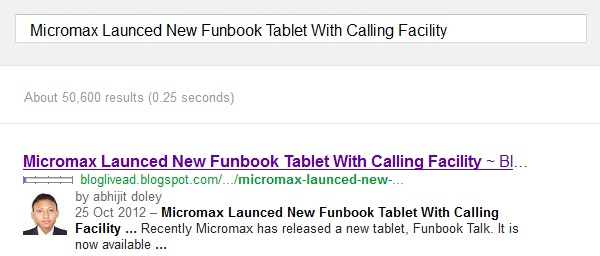
How To Display Your Profile Picture In Google Search Results
Do you know you can display your image next to the links of your website or blog on search results page? Earlier this feature was only limited to few reserved users of Google. Now everyone who owns blog or website can use this feature. The main advantage of using this feature is that more visitors will be attracted to your pages and there will be a big rise in click ratio of your pages as visitors will prefer your blog.
You will need :-
A Google Plus Account
An About Me page on your blog.
Now you can follow the steps given below :-
1) On your blog or website header or footer or sidebar add this link,
<a href="https://plus.google.com/GOOGLE+ ID"
rel="author" target="_blank"> Join me on Google+</a>
Replace GOOGLE+ ID with your Google+ profile id.
2) In your About Me page, add the link given below anywhere you want,
<a href="https://plus.google.com/GOOGLE+ ID"
rel="me" target="_blank"> My Google Profile</a>
Replace GOOGLE+ ID with your Google+ profile id.
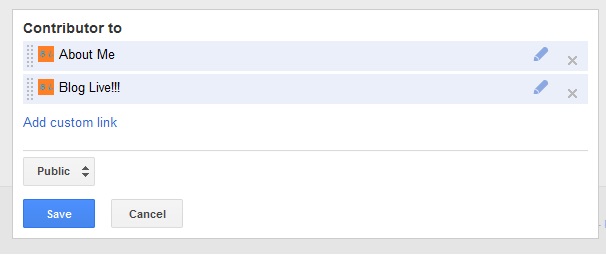
3) Go to your Google+ profile and click the “Edit Profile” button
Go to About tab and click on 'Contributer to' field.
Add your Blog/site homepage URL and also the URL of your About page.
4) Go to http://profiles.google.com/me/plusones.
Click Edit Profile.
Check the Show this tab on my profile checkbox.
Next Upload a quality Profile Pic of your self . Your image will look best if it is 150px by 150px in size.
Finally Save your profile.
It will take few days (around 2-5 days) to show up your photo and name next to the links of your website or blog on search results.
You will need :-
A Google Plus Account
An About Me page on your blog.
Now you can follow the steps given below :-
1) On your blog or website header or footer or sidebar add this link,
<a href="https://plus.google.com/GOOGLE+ ID"
rel="author" target="_blank"> Join me on Google+</a>
Replace GOOGLE+ ID with your Google+ profile id.
2) In your About Me page, add the link given below anywhere you want,
<a href="https://plus.google.com/GOOGLE+ ID"
rel="me" target="_blank"> My Google Profile</a>
Replace GOOGLE+ ID with your Google+ profile id.
3) Go to your Google+ profile and click the “Edit Profile” button
Go to About tab and click on 'Contributer to' field.
Add your Blog/site homepage URL and also the URL of your About page.
4) Go to http://profiles.google.com/me/plusones.
Click Edit Profile.
Check the Show this tab on my profile checkbox.
Next Upload a quality Profile Pic of your self . Your image will look best if it is 150px by 150px in size.
Finally Save your profile.
It will take few days (around 2-5 days) to show up your photo and name next to the links of your website or blog on search results.

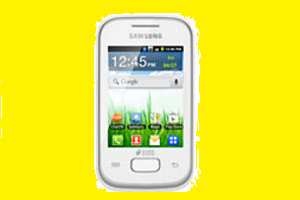
How To Connect Samsung Galaxy Phones With PC As Modem To Surf Internet From PC
One of my friend was facing problem in connecting his newly bought Samsung Galaxy Phone with his computer for using Internet in his computer. Well I guess many of you are facing the same situation. As Samsung Galaxy phones are Android phones so your Samsung Galaxy phone will not be connected via Samsung New PC Studio software. So I am here to give you the right solution to your problem. Read this tutorial and follow all the steps given to connect your Samsung Galaxy phone easily with your computer and surf internet.
1. First of all plug in your Samsung Galaxy phone to PC via USB cable and do not select the file transfer mode.
2. Go to menu >> settings >> wireless and network >> mobile network.
And check "Use packet data"
3. Now Go to menu >> settings >> wireless and network >> Tethering and Portable Hotspot.
And check "USB Tethering"
4. Install Kies on your PC, Download Link Of Kies
5. Now in PC, go to Control Panel >> Network and Internet connections >> Network connections
Here you will see Samsung modem.
Now you can connect.
Ok, if your problem is solved then like the post or give your feedback in comment box.
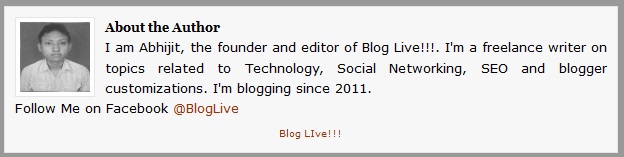
How To Add About The Author Box Below Blog Post In Blogger
You have seen About the author box below blog posts in many Wordpress blogs. But in Blogger there is no such feature enabled. Dont worry Blogger guys, you can still include that same feature in blogger by adding some codes. Its a simple process. Read the instructions given below and follow them to get a new professional look in your blog.
Just look at my About the author box given below:
STEPS:-
1--> Login to your Blogger Account.
2--> Go to Blogger Admin Page > Template > Click on Edit HTML.
3--> Click Expand Widgets
4--> Search for codes given below
]]></b:skin>
Just above it paste the following codes given below
.author-box {
background: #F7F7F7;
margin: 20px 0 40px 0;
padding: 10px;
border: 1px solid #E6E6E6;
overflow: auto;
}
.author-box p {
margin: 0;
padding: 0;
}
.author-box img {
background: #FFFFFF;
float: left;
margin: 0 10px 0 0;
padding: 4px;
border: 1px solid #E6E6E6;
}
This is the CSS part
5--> Search for codes given below
<div class='post-footer-line post-footer-line-1'/>
Just below it paste the codes given below:
<b:if cond='data:blog.pageType == "item"'>
<div class='author-box'>
<p><img alt='' class='avatar avatar-70 photo' height='70' src='Your Photo Link' width='70'/><b>About the Author</b><br/>
<div style='text-align: justify; font-family: verdana; color: rgb(0, 0, 0);'>Write Something About yourself<br/>
Follow Me on Twitter <a href=' Your Twitter Link '>Your Twitter link Anchor text</a>
<p style='margin:-8px 0'><br/><center>
<a href=' Your Blog link ' style='text-decoration:none;font-size:70%;'>Your Blog Name</a></center>
</p></div></p>
</div>
</b:if>
Change the following things as you wish them to be displayed
Your Photo Link
About the Author text
Write Something About yourself
Your Twitter Link
Your Twitter link Anchor text
Your Blog Link
Your Blog Name
6--> Save template and done :)
Feel the new look of your Blogger blog.
Creating Sitemap Page In Your Blogger Blog
You need to submit your sitemap to popular search engines to make your blog pages index by them. Sitemap page in a blog helps the visitors to track the contents of that blog. You have seen sitemap pages in many blogs. Have you thought of creating a sitemap page in blogger blog? Yeah it is possible.This tutorial will help you in creating a sitemap page in your blogger blog.
Steps To Create A Sitemap Page In Your Blogger Blog:-
1) Go to Edit HTML section of your blogger dashboard. Check Expand Template Widget.
2) Ctrl + F and search </head>
3) Paste the following codes above </head>
<script>
var numposts = 100;
var showpostdate = false;
var showpostsummary = false;
var numchars = 200;
</script>
<script>
function rp(json) {
document.write('<ul>');
for (var i = 0; i < numposts; i++) {
document.write('<li>');
var entry = json.feed.entry[i];
var posttitle = entry.title.$t;
var posturl;
if (i == json.feed.entry.length) break;
for (var k = 0; k < entry.link.length; k++) {
if (entry.link[k].rel == 'alternate') {
posturl = entry.link[k].href;
break;
}
}
posttitle = posttitle.link(posturl);
var readmorelink = "(more)";
readmorelink = readmorelink.link(posturl);
var postdate = entry.published.$t;
var cdyear = postdate.substring(0,4);
var cdmonth = postdate.substring(5,7);
var cdday = postdate.substring(8,10);
var monthnames = new Array();
monthnames[1] = "Jan";
monthnames[2] = "Feb";
monthnames[3] = "Mar";
monthnames[4] = "Apr";
monthnames[5] = "May";
monthnames[6] = "Jun";
monthnames[7] = "Jul";
monthnames[8] = "Aug";
monthnames[9] = "Sep";
monthnames[10] = "Oct";
monthnames[11] = "Nov";
monthnames[12] = "Dec";
if ("content" in entry) {
var postcontent = entry.content.$t;
} else if ("summary" in entry) {
var postcontent = entry.summary.$t;
} else
var postcontent = "";
var re = /<S[^>]*>/g;
postcontent = postcontent.replace(re, "");
document.write(posttitle);
if (showpostdate == true) document.write(' - ' + monthnames[parseInt(cdmonth,10)] + ' ' + cdday);
if (showpostsummary == true) {
if (postcontent.length < numchars) {
document.write(postcontent);
} else {
postcontent = postcontent.substring(0, numchars);
var quoteEnd = postcontent.lastIndexOf(" ");
postcontent = postcontent.substring(0,quoteEnd);
document.write(postcontent + '...' + readmorelink);
}
}
document.write('</li>');
}
document.write('</ul>');
}
</script>
4) Save the template.
5) Now create a new page.
Give a title to the page (sitemap or anything)
Select HTML section and paste the following script.
<script src="http://www.BlogName.com/feeds/posts/default?orderby=published&alt=json-in-script&callback=rp"></script>
Replace the red section with your domain.
Publish it.
Now you got the sitemap page in your blogger blog.
How To Change "View My Complete Profile" Text Of Profile Widget In Blogger
You are tired of seeing same text i.e "View My Complete Profile" in profile widget of every blogger blog. Its time for you to change the text of your profile widget in your own blogger blog. If you want to know how to change "View My Complete Profile" text in your profile widget in blogger blog, then you are in the right place. Today I will explain you how to change "View My Complete Profile" text in blogger blog. By using this trick you can show up your own text in place of the blogger's default text.
Steps:-
1) Go to the Edit HTML section of your template. Check in Expand Widget Template.
2) Now search the following codes in your template's widget section.
<a class='profile-link' expr:href='data:userUrl'><data:viewProfileMsg/></a>
3) Replace <data:viewProfileMsg/> with text you want to display instead of blogger's default text i.e "View My Complete Profile".
Example:
<a class='profile-link' expr:href='data:userUrl'>To know more about me click here</a>
4) Save the template and check your profile widget by visiting your homepage of your blog.
Numbered Page Navigation For Blogger
You have notice numbered page navigation in many blogs. This feature is not provided by blogger blogs. Instead blogger blogs provides older posts and previous posts links. Numbered page navigation not only helps in improving the look of the blogger blog, it also helps in faster navigation to older posts . This tutorial will help you in incorporating numbered page navigation in blogger blog.

Steps To Change Older Posts Link In Blogger With Numbered Page Navigation:-
1) Login to Blogger Dashboard and navigate to Layout > Edit Html
2) Press Ctrl + F and find ]]></b:skin>
and just above it paste the codes given below
3) Now Find </body>
and just above it paste the following codes
4) Save the template and its done.
This tutorial is based on Codes from Abu Farhan and Muhammad Rias. So if you plan to write this tutorial on your blog,do link back to them also.

Steps To Change Older Posts Link In Blogger With Numbered Page Navigation:-
1) Login to Blogger Dashboard and navigate to Layout > Edit Html
2) Press Ctrl + F and find ]]></b:skin>
and just above it paste the codes given below
.showpageArea a { text-decoration:underline; } .showpageNum a { text-decoration:none; border: 1px solid #cccccc; margin:0 3px; padding:3px; } .showpageNum a:hover { border: 1px solid #cccccc; background-color:#cccccc; } .showpagePoint { color:#333; text-decoration:none; border: 1px solid #cccccc; background: #cccccc; margin:0 3px; padding:3px; } .showpageOf { text-decoration:none; padding:3px; margin: 0 3px 0 0; } .showpage a { text-decoration:none; border: 1px solid #cccccc; padding:3px; } .showpage a:hover { text-decoration:none; } .showpageNum a:link,.showpage a:link { text-decoration:none; color:#333333; }
This was the CSS part for look and feel of the page navigation. You can modify it according to your need3) Now Find </body>
and just above it paste the following codes
<!--Page Navigation Starts-->
<b:if cond='data:blog.pageType != "item"'>
<b:if cond='data:blog.pageType != "static_page"'>
<script type='text/javascript'>
var pageCount=5;
var displayPageNum=5;
var upPageWord ='Previous';
var downPageWord ='Next';
</script>
<script src='http://bloggergadgets.googlecode.com/files/blogger_pagenavi_min.js' type='text/javascript'/> </b:if>
</b:if>
<!--Page Navigation Ends -->
4) Save the template and its done.
This tutorial is based on Codes from Abu Farhan and Muhammad Rias. So if you plan to write this tutorial on your blog,do link back to them also.
How To Burn ISO To USB And Make USB Bootable
Today we will teach you how you can burn ISO to a USB drive and make that USB drive bootable. To do this task we need a suitable software that can make your USB drive in bootable drive. You can use a software called Unetbootin for this purpose. This software has very simple interface and is very easy to use. Unetbootin is free of cost and you can download it from their official site. Unetbootin is available for windows, linux and Mac OS X users.
Subscribe to:
Posts (Atom)