Post Title Followed By Blog Title
By default your Blogger blog title appears first followed by your post title in search engines. People always search for more specific contents. And because of this reason there are more chances of overlooking of your website link by visitors even if your link is at the top of the search results of search engines. To increase click conversion of your links, display your post title first followed by your blog title because it is the post title that gives visitors an idea about what the post is all about and what contents the post is containing. It will surely help in attracting visitors eyes to your links to a large extent. In this post I will show you how to implement it by using a small piece of code in your blogger template.
1) Login to your Blogger account
2) Go to Blogger Admn Page > Template > Click on Edit HTML >Click on Proceed
3) At the top of your template you would find a piece of code similar to the codes given below.
<head>
<b:include data='blog' name='all-head-content'/>
<title><data:blog.pageTitle/></title>
<b:include data='blog' name='all-head-content'/>
<title><data:blog.pageTitle/></title>
4) Replace the line
<title><data:blog.pageTitle/></title>with the code below.
<b:if cond='data:blog.pageType == "index"'>
<title><data:blog.pageTitle/></title>
<b:else/>
<title><data:blog.pageName/> | <data:blog.title/></title>
</b:if>
<title><data:blog.pageTitle/></title>
<b:else/>
<title><data:blog.pageName/> | <data:blog.title/></title>
</b:if>
5) Its all done. Now your post title will appear first followed by the blog title.

Add Mashable Like Social Media Widget
Mashable created a beautiful social media widget. The look of this widget is awesome. Just look at the snapshot given below. You can also add this mashable-like social media widget to your Blogger blog. This widget will get perfectly fitted in your blog's sidebar. It is one in all social media widget. It contains Facebook fanpage,Twitter follow us, attractive subscription box, RSS feed, LinkedIn and Google Plus. You can add or change social media links too if you know a little bit of coding.

Many bloggers have already added this widget in their blog. If you want to add this widget in your blog then follow the steps that includes mere copy and paste task. Here is the complete steps to be taken to get the mashable like social media widget in your blogger blog.
1) Login to your Blogger account.
2) Go to Blogger Admin Page > Layout
3) Click on Add a Gadget and select HTML/Javascript.
4) Copy-paste the code given below in notepad:
Now look after the following things that are given below:-
Replace YOURFACEBOOKUSERNAME with your Facebook username.
Replace YOURTWITTERUSERNAME with your twitter username.
Replace YOURFEEDBURNERTITLE with your Feedburner title. Your Feedburner title is the word added at the end of your Feedburner link. Example: http://feeds.feedburner.com/YourFeedBurnetTitle
Replace YOURRSSFEEDLINK with your feedburner link.
Replace YOURLINKEDINPROFILELINK with your Linkedin profile link.
Replace YOURGOOGLE+PROFILELINK with your Google Plus profile link.
After replacing all these parameters mentioned above, copy and paste the final codes from your notepad to the HTML-Javascript section.
5) Click Save and get your Mashable like social media widget.
Contact me if you want to more about it or if you are facing some problem in the steps. Just throw a comment in the comment box, I will be there.
For this wonderful social media widget, all credits goes to the man behind mashable.com.
Many bloggers have already added this widget in their blog. If you want to add this widget in your blog then follow the steps that includes mere copy and paste task. Here is the complete steps to be taken to get the mashable like social media widget in your blogger blog.
1) Login to your Blogger account.
2) Go to Blogger Admin Page > Layout
3) Click on Add a Gadget and select HTML/Javascript.
4) Copy-paste the code given below in notepad:
<style> /* Social Widget */ #MBT-mashable-bar { border: 0; margin-bottom: 10px; margin: 0 auto; width:300px; } .fb-likebox { background: #fff; padding: 10px 10px 0 10px; border: 1px solid #D8E6EB; margin-top: -2px; height:80px; } .googleplus { background: #F5FCFE; border-top: 1px solid #FFF; border-bottom: 1px solid #ebebeb; border-right: 1px solid #D8E6EB; border-left: 1px solid #D8E6EB; border-image: initial; font-size: .90em; font-family: "Arial","Helvetica",sans-serif; color: #000; padding: 9px 11px; line-height: 1px;} .googleplus span { color: #000; font-size: 11px; position: absolute; display:inline-block; margin: 9px 70px;} .g-plusone { float: left;} .twitter { background: #EEF9FD; padding: 10px; border: 1px solid #C7DBE2; border-top: 0;} #mashable { background: #EBEBEB; border: 1px solid #CCC; border-top: 1px solid white; padding: 2px 8px 2px 3px; text-align: right; border-image: initial;} #mashable .author-credit {} #mashable .author-credit a { font-size: 10px; font-weight: bold; text-shadow: 1px 1px white; color: #1E598E; text-decoration:none;} #email-news-subscribe .email-box{ padding: 5px 10px; font-family: "Arial","Helvetica",sans-serif; border-top: 0; border-right: 1px solid #C7DBE2; border-left: 1px solid #C7DBE2; border-image: initial; height:35px;} #email-news-subscribe .email-box input.email{ background:#FFFFFF; border: 1px solid #dedede; color: #999; padding: 7px 10px 8px 10px; -moz-border-radius: 3px; -webkit-border-radius: 3px; -o-border-radius: 3px; -ms-border-radius: 3px; -khtml-border-radius: 3px; border-radius: 3px; border-image: initial; font-family: "Arial","Helvetica",sans-serif;} #email-news-subscribe .email-box input.email:focus{color:#333} #email-news-subscribe .email-box input.subscribe{ background: -moz-linear-gradient(center top,#FFCA00 0,#FF9B00 100%); background: -webkit-gradient(linear,left top,left bottom, color-stop(0,#FFCA00),color-stop(1,#FF9B00)); background: -moz-linear-gradient(center top,#FFCA00 0,#FF9B00 100%); -pie-background: linear-gradient(270deg,#ffca00,#ff9b00); font-family: "Arial","Helvetica",sans-serif; border-radius:3px; -moz-border-radius:3px; -webkit-border-radius:3px; border:1px solid #cc7c00; color:white; text-shadow:#d08d00 1px 1px 0; padding:7px 14px; margin-left:3px; font-weight:bold; font-size:12px; cursor:pointer; border-image: initial;} #email-news-subscribe .email-box input.subscribe:hover{ background: #ff9b00; background-image:-moz-linear-gradient(top,#ffda4d,#ff9b00); background-image:-webkit-gradient(linear,left top,left bottom, from(#ffda4d),to(#ff9b00)); filter:progid:DXImageTransform.Microsoft.Gradient(startColorStr=#ffffff, endColorStr=#ebebeb); outline:0;-moz-box-shadow:0 0 3px #999; -webkit-box-shadow:0 0 3px #999; box-shadow:0 0 3px #999 background:-webkit-gradient(linear,left top,left bottom, color-stop(0,#ffda4d),color-stop(1,#ff9b00)); background:-moz-linear-gradient(center top,#ffda4d 0,#ff9b00 100%); -pie-background:linear-gradient(270deg,#ffda4d,#ff9b00); border-radius:3px; -moz-border-radius:3px; -webkit-border-radius:3px; border:1px solid #cc7c00; color:#FFFFFF; text-shadow:#d08d00 1px 1px 0} #other-social-bar { background-color: #D8E6EB; box-shadow: 0 1px 1px #FFFFFF inset; padding: 0px; font-family: "Arial","Helvetica",sans-serif; font-weight:bold; overflow: hidden; border: 1px solid #B6D0DA; height:37px; } #other-social-bar ul {list-style: none outside none; padding-left: 4px;} #other-social-bar .other-follow { float: left; color:#1E598E; overflow: hidden; height:20px; padding:5px; width: 270px;} #other-social-bar .other-follow ul { list-style: none outside none; padding-left: 4px;} #other-social-bar .other-follow ul li { font-size: 12px; font-weight: bold; display:inline; border:0; text-shadow: 1px 1px white;} #other-social-bar .other-follow ul li a { font-size: 12px; color:#1E598E; font-weight: bold; display:inline; text-shadow: 1px 1px white;} #other-social-bar .other-follow li { font-size: 12px; font-weight: bold; display:inline; border:0; text-shadow: 1px 1px white;} #other-social-bar .other-follow li a { font-size: 12px; color:#1E598E; font-weight: bold; display:inline; text-shadow: 1px 1px white;} #other-social-bar .other-follow li.my-rss { background: url('http://3.bp.blogspot.com/-sR72SM_Wets/TwHZG9y4hXI /AAAAAAAAFv8/0bP2R3Qkl8c/s400/rss-16x16.png') no-repeat transparent; line-height: 1; padding: 0px 3px 1px 20px; width: 60px; margin-bottom:0px; margin-left:5px;} #other-social-bar .other-follow li.my-rss a, #other-social-bar .other-follow li.my-linkedin a, #other-social-bar .other-follow li.my-gplus a{ text-decoration:none; } #other-social-bar .other-follow li.my-rss a:hover, #other-social-bar .other-follow li.my-linkedin a:hover, #other-social-bar .other-follow li.my-gplus a:hover{ text-decoration:underline; } #other-social-bar .other-follow li.my-linkedin { background: url('http://4.bp.blogspot.com/-ht4UMG88lvM/ TwHZFFgc-1I/AAAAAAAAFvs/BBmINSJhUsk/s400/linkedin-16x16.png') no-repeat transparent; line-height: 1; padding: 0px 3px 1px 20px; width: 60px; margin-bottom:0px;} #other-social-bar .other-follow li.my-gplus { background: url(http://4.bp.blogspot.com/-cC729VpBxrk/TwHZE71ZgoI /AAAAAAAAFvk/_UMyIgA8vj8/s400/gplus-16x16.png) no-repeat transparent; line-height: 1; width: 60px; padding: 0px 3px 1px 20px; margin-bottom:0px;} </style> <!--[if IE]> <style> #email-news-subscribe .email-box input.subscribe{ background: #FFCA00; } </style> <![endif]--> <!--begin of social widget--> <div style="margin-bottom:10px;"> <div id="MBT-mashable-bar" > <!-- Begin Widget --> <div class="fb-likebox"> <!-- Facebook --> <iframe src="//www.facebook.com/plugins/like.php?href=http://facebook.com/YOURFACEBOOKUSERNAME&send=false&layout=standard& width=200px&show_faces=true &action=like&colorscheme=light& font&height=100px&appId=234513819928295" scrolling="no" frameborder="0" style="border:none; overflow:hidden; "></iframe> </div> <div class="googleplus"> <!-- Google --> <span>Recommend us on Google! </span><div class="g-plusone" data-size="medium"></div> <script type="text/javascript" src="https://apis.google.com/js/plusone.js"> </script> </div> <div class="twitter"> <!-- Twitter --> <iframe title="" style="width: 300px; height: 20px;" class="twitter-follow-button" src="http://platform.twitter.com/widgets/follow_button.html#_=1319978796351& align=&button=blue&id=twitter_tweet_button_0& lang=en&link_color=&screen_name=YOURTWITTERUSERNAME&show_count=& show_screen_name=&text_color=" frameborder="0" scrolling="no"></iframe> </div> <div id="email-news-subscribe"> <!-- Email Subscribe --> <div class="email-box"> <form action="http://feedburner.google.com/fb/a/mailverify" method="post" target="popupwindow" onsubmit="window.open ('http://feedburner.google.com/fb/a/mailverify?uri=YOURFEEDBURNERTITLE', 'popupwindow', 'scrollbars=yes,width=550,height=520');return true"> <input class="email" type="text" style="width: 150px; font-size: 12px;" id="email" name="email" value="Enter Your Email here.." onfocus="if(this.value==this.defaultValue)this.value='';" onblur="if(this.value=='')this.value=this.defaultValue;" /> <input type="hidden" value="pctipsandtricks4u/myRh" name="uri" /> <input type="hidden" name="loc" value="en_US" /> <input class="subscribe" name="commit" type="submit" value="Subscribe" /> </form> </div> </div> <div id="other-social-bar"> <!-- Other Social Bar --> <ul class="other-follow"> <li class="my-rss"> <a rel="nofollow" title="RSS" href="YOURRSSFEEDLINK" target="_blank"> RSS Feed</a> </li> <li class="my-linkedin"> <a rel="nofollow" title="linkedin" rel="author" href="YOURLINKEDINPROFILELINK" target="_blank">linkedin</a> </li><li class="my-gplus"> <a rel="nofollow" title="Google Plus" rel="author" href="YOURGOOGLE+PROFILELINK" target="_blank">Google Plus</a> </li> </ul> </div> <div id="mashable" style="background: #EBEBEB;border: 1px solid #CCC;border-top: 1px solid white;padding: 1px 8px 1px 3px;text-align: right;border-image: initial;font-size:10px;font-family: "arial","helvetica",sans-serif;"> <span class="author-credit" style="font-family: Arial, Helvetica, sans-serif;"> <a href="http://blogtipsandtricks4u.blogspot.com" target="_blank" >Blogger Widgets û</a></span></div></div> <!-- End Widget --> </div> <!--end of social widget-->
Now look after the following things that are given below:-
Replace YOURFACEBOOKUSERNAME with your Facebook username.
Replace YOURTWITTERUSERNAME with your twitter username.
Replace YOURFEEDBURNERTITLE with your Feedburner title. Your Feedburner title is the word added at the end of your Feedburner link. Example: http://feeds.feedburner.com/YourFeedBurnetTitle
Replace YOURRSSFEEDLINK with your feedburner link.
Replace YOURLINKEDINPROFILELINK with your Linkedin profile link.
Replace YOURGOOGLE+PROFILELINK with your Google Plus profile link.
After replacing all these parameters mentioned above, copy and paste the final codes from your notepad to the HTML-Javascript section.
5) Click Save and get your Mashable like social media widget.
Contact me if you want to more about it or if you are facing some problem in the steps. Just throw a comment in the comment box, I will be there.
For this wonderful social media widget, all credits goes to the man behind mashable.com.
How To Create A New Page In Blogger
Blogger is a popular blog-publishing service powered by Google. To know how to create a blog in Blogger, read my post - How To Create A Blog In Blogger. Many of you are preferring Blogger over many other blog publishing services available online. This is because of rapidly increasing new features in Blogger and it is free of cost. Some of you created your blog to showcase your writing ability and others to build their business over Internet.

Let's now come to the point. The reason of writing this post is to help you in creating new pages in Blogger blogs. If you are a newbie and don't know how to create a page in Blogger blogs then read this post. I am creating a sample page to show you the whole process.
Steps To Create A New Page In Blogger:
1) Login to your Blogger account.
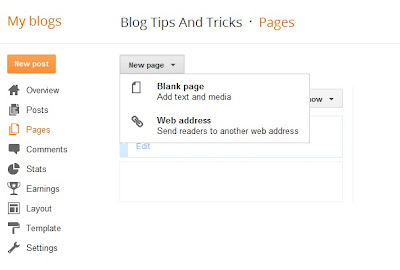
2) Go to Blogger Admin>Pages
3) Click on New page

4) Select Blank page
5) Page Editor will come up. Enter page title in page title section and write your content in the content box. There you can see a editor menu bar that will help you in styling your content. For example you can change text fonts, choose text colours, make text bold, italics etc . You can also put links or images in your content.
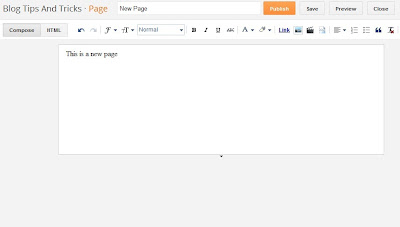
5) After you are done with editing your content, click on Publish to create your new page.
My sample page look like this:

You can put the link of your new page anywhere in the blog where you want to show the link to your readers. The best position for putting the link of your pages are position above header and position below header because it will be more visible to your visitors. So this is how you can create new pages in Blogger blog. For more tips and tricks keep visiting bloglivead.blogspot.com regularly. You can also like my facebook page for getting all the latest updates. URL of my facebook page is - facebook.com/BlogLive123
Let's now come to the point. The reason of writing this post is to help you in creating new pages in Blogger blogs. If you are a newbie and don't know how to create a page in Blogger blogs then read this post. I am creating a sample page to show you the whole process.
Steps To Create A New Page In Blogger:
1) Login to your Blogger account.
2) Go to Blogger Admin>Pages
3) Click on New page

4) Select Blank page

5) Page Editor will come up. Enter page title in page title section and write your content in the content box. There you can see a editor menu bar that will help you in styling your content. For example you can change text fonts, choose text colours, make text bold, italics etc . You can also put links or images in your content.

5) After you are done with editing your content, click on Publish to create your new page.
My sample page look like this:

You can put the link of your new page anywhere in the blog where you want to show the link to your readers. The best position for putting the link of your pages are position above header and position below header because it will be more visible to your visitors. So this is how you can create new pages in Blogger blog. For more tips and tricks keep visiting bloglivead.blogspot.com regularly. You can also like my facebook page for getting all the latest updates. URL of my facebook page is - facebook.com/BlogLive123
Add A Contact Form In Your Blogger Blogspot
Creating a contact form page in your blog will be helpful for your readers as then they will be able to communicate with you directly. It will give them a easy way to share their problems with you. Even this will allow them to give feedbacks and viewpoints to you for your blog.

It is easy to create contact form in wordpress blogs. Blogger don't have such feature but good news is that you can create contact form in Blogger by adding some piece of codes. There are many websites providing this kind of services. Emailmeform.com is one of such website that provides this kind of service. Emailmeform provides free code for using a contact form. This tutorial will help you to create a contact form page in blogger.
Steps To Add A Contact Form In Your Blogger Blog
1) Sign up for a free account at emailmeform
2) Once you done with regstration process, click on the "Add Form" button.
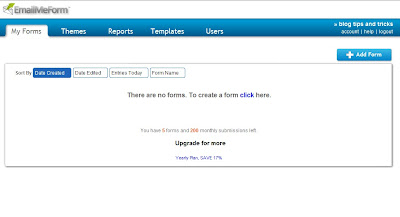 3) A popup window wll come up to show you two options:
a) You can go to template section and choose from a list of pre-made forms.
b) Or you can go to form builder to create your own form.
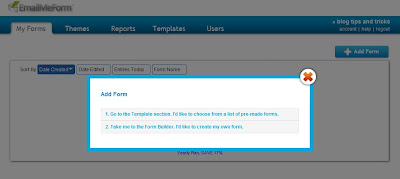
4) I would prefer to create my own form. Choose the form builder option.
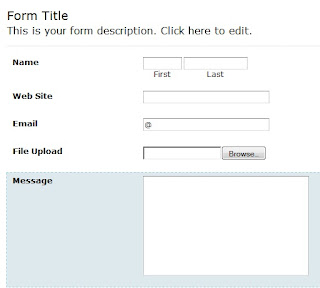
5) Choose parameters you need in your contact form.

I have selected Name, Website, Email, File Upload and Paragraph text.
I have changed field Label of "Paragraph Text" to "Message"
7) Now my form looks like this:
8) Now click on the Form Title to give title to your form and add some descrption or you can uncheck tick if you dont need this. I have uncheck this parameter. Click Save button.
9) A popup wndow will come up like this:
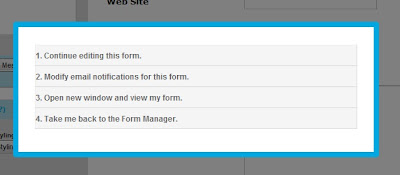
Choose the second option and add a recipient email ID.
8) Again a popup window will show up choose the third option.

9) In Form manager Click Code and Choose the "HTML Only" option and copy the code.

11) Paste the code to your newly created blogger page and you are done. To know how to create blogger page read How To Create A New Page In Blogger.
It is easy to create contact form in wordpress blogs. Blogger don't have such feature but good news is that you can create contact form in Blogger by adding some piece of codes. There are many websites providing this kind of services. Emailmeform.com is one of such website that provides this kind of service. Emailmeform provides free code for using a contact form. This tutorial will help you to create a contact form page in blogger.
Steps To Add A Contact Form In Your Blogger Blog
1) Sign up for a free account at emailmeform
2) Once you done with regstration process, click on the "Add Form" button.

a) You can go to template section and choose from a list of pre-made forms.
b) Or you can go to form builder to create your own form.

4) I would prefer to create my own form. Choose the form builder option.
5) Choose parameters you need in your contact form.

I have selected Name, Website, Email, File Upload and Paragraph text.
I have changed field Label of "Paragraph Text" to "Message"
7) Now my form looks like this:

8) Now click on the Form Title to give title to your form and add some descrption or you can uncheck tick if you dont need this. I have uncheck this parameter. Click Save button.
9) A popup wndow will come up like this:

Choose the second option and add a recipient email ID.
8) Again a popup window will show up choose the third option.

9) In Form manager Click Code and Choose the "HTML Only" option and copy the code.

11) Paste the code to your newly created blogger page and you are done. To know how to create blogger page read How To Create A New Page In Blogger.
How To Add Or Change Favicon On Blogger
A favicon which is short form for Favorite icon, also known as a shortcut icon, web site icon, URL icon, or bookmark icon, is a small icon which is usually 16px X 16px in size. You may have noticed a small icon picture just before the URL of any website in your browser's address bar. That small icon is called a favicon. For every website there is a favicon. Google Blogger provides same favicon for every Blogger blog by default. Blogger favicon just look the way represented in the image given below.

Blogger also allow its users to remove or change their blog's favicon anytime. This favicon can be a unique identity of your blog. So design your favicon and add new favicon in your blog. Above picture illustrates the difference between the default Blogger favicon and self designed favicon. Build a impressive and unique favicon for your blog. This tutorial is for helping you in removing default Blogger favicon and adding your self designed favicon. You should be ready with your self designed favicon before applying this change in your blog.
Steps To Add Or Change Favicon On Blogger:
1) Log in to your blogger account.
2) Go to Blogger Admin>Layout
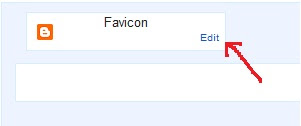
3) Click on the Edit link on the "Favicon" setting.
4) A popup window will open from where you can browse to your favicon image kept in your hard drive to replace the default favicon image. Click on browse and select the favicon file from your computer hard drive. Always remember that favicon file must be a square image, file must be in .ico file extension and file must be less than 100 KB in size.

5) Click on Save button and open your site to see the change.
Now you got your self designed favicon in your blog. How it feels to have your own favicon of your blog???
Blogger also allow its users to remove or change their blog's favicon anytime. This favicon can be a unique identity of your blog. So design your favicon and add new favicon in your blog. Above picture illustrates the difference between the default Blogger favicon and self designed favicon. Build a impressive and unique favicon for your blog. This tutorial is for helping you in removing default Blogger favicon and adding your self designed favicon. You should be ready with your self designed favicon before applying this change in your blog.
Steps To Add Or Change Favicon On Blogger:
1) Log in to your blogger account.
2) Go to Blogger Admin>Layout
3) Click on the Edit link on the "Favicon" setting.

4) A popup window will open from where you can browse to your favicon image kept in your hard drive to replace the default favicon image. Click on browse and select the favicon file from your computer hard drive. Always remember that favicon file must be a square image, file must be in .ico file extension and file must be less than 100 KB in size.

5) Click on Save button and open your site to see the change.
Now you got your self designed favicon in your blog. How it feels to have your own favicon of your blog???
How To Submit Blogger Sitemap To Google Webmaster
We all use Google for searching information that we want to know. Google provides us links of webpages that contains the information that we are looking after. If you own a blog then you might be doing everything possible to get more visits to your blog. To get traffics from search engines your blog must be indexed in the respective search engines. Your blog will be indexed in search engine only when you have submitted your blog to that search engine.

Today I am going to show you how you can submit your Blogger blog to the giant search Engine - Google. Google is the most popular search engine and number of webpages indexed by Google is uncountable. To make Google find, index and rank your site you need to submit your sitemap of your site to Google Webmaster Tools. Google Webmaster is a good SEO tool to use. You could also keep track of your sites statistics with the help of Google Webmaster Tools. As a new blogger you may not know how to submit your blogger sitemap to Google Webmaster Tools. Here I am to help you.
Steps To Submit Blogger Sitemap To Google Webmaster:-
1) Go to http://www.google.com/webmasters/
2) Sign in to Webmaster Tools with your gmail id and password

3) You can see now a thumbnail and a link of your site. Click on the anyone of them to go to Dashboard of Webmaster Tools.

4) Click on Sitemaps

5) Click on ADD/TEST SITEMAP
Use http://YOURBLOGNAME.blogspot.com/atom.xml?redirect=false&start-index=1&max-results=500 as your blogger sitemap
where red section is the name of your blog
Copy and paste the blue section of your sitemap in the space provided.
 6) Click on Submit Sitemap and refresh the page
Your webpages are submitted and waiting to be indexed.
When you login to your Google Webmaster some days later, you should be able to see the indexed pages and statistics of your blogger. Hope this helped you.
Today I am going to show you how you can submit your Blogger blog to the giant search Engine - Google. Google is the most popular search engine and number of webpages indexed by Google is uncountable. To make Google find, index and rank your site you need to submit your sitemap of your site to Google Webmaster Tools. Google Webmaster is a good SEO tool to use. You could also keep track of your sites statistics with the help of Google Webmaster Tools. As a new blogger you may not know how to submit your blogger sitemap to Google Webmaster Tools. Here I am to help you.
Steps To Submit Blogger Sitemap To Google Webmaster:-
1) Go to http://www.google.com/webmasters/
2) Sign in to Webmaster Tools with your gmail id and password

3) You can see now a thumbnail and a link of your site. Click on the anyone of them to go to Dashboard of Webmaster Tools.

4) Click on Sitemaps

5) Click on ADD/TEST SITEMAP
Use http://YOURBLOGNAME.blogspot.com/atom.xml?redirect=false&start-index=1&max-results=500 as your blogger sitemap
where red section is the name of your blog
Copy and paste the blue section of your sitemap in the space provided.

Your webpages are submitted and waiting to be indexed.
When you login to your Google Webmaster some days later, you should be able to see the indexed pages and statistics of your blogger. Hope this helped you.
How To Add A Widget Of Social Media Sharing Buttons
Social networking sites can be a good medium of getting large traffics to your blog. We all use social networking sites to communicate with our friends and we often share our status, thoughts, emotions, photos, links, videos etc with our friends. If a link of your blog is shared in the social networking sites by somebody then his/her friends will also come to know about your blog. As a blogger you will always be happy if your visitors share link of your blog posts with their friends and followers in social networking sites. A widget which contains group of social media sharing buttons will ease your work a lot and you can allow your visitors with an option of sharing your blog post via this widget.

Steps To Add A Widget Of Social Media Sharing Buttons
1) Log in to your blogger account.
2)Go to Blogger Admin > Layout > Click on Add a Gadget.

3) Select HTML/Javascript in Add a Gadget window.

4) Copy and paste the given code below in the content box.
5) Click on Save button. Now you got that widget in your blog.
You can add this widget anywhere you want. Choose the buttons of your favourite social networking sites. Your visitors will definitely share your post if they like your posts.
Here in my blog, you can find some different widgets too for social media sharing.
Look of this widget is simple and can be fitted anywhere in your blog. Social media sharing buttons includes buttons of twitter, delicious, facebook, digg, stumbleupon, favourites and more. You can add or replace or remove buttons according to your needs. Choose the social media buttons which are more popular in your country. To know about how social media can play a big role in the success of a blog or website read my post - Role Of Social Media In Promotion Of A Blog Or Website.
Steps To Add A Widget Of Social Media Sharing Buttons
1) Log in to your blogger account.
2)Go to Blogger Admin > Layout > Click on Add a Gadget.
3) Select HTML/Javascript in Add a Gadget window.

4) Copy and paste the given code below in the content box.
<div class='widget-wrap'> <h3 class='widgettitle'></h3> <div class='addthis_toolbox'> <div class='custom_images'> <a class='addthis_button_twitter'><img alt='Twitter' height='32' src='http://2.bp.blogspot.com/-TUTjx0Yc0FY/TXSLKPiLRbI/AAAAAAAAA3U/nI4HkE091Lk/s1600/twitter.png' width='32'/></a> <a class='addthis_button_delicious'><img alt='Delicious' height='32' src='http://4.bp.blogspot.com/-UWnmf5jmYYo/TXSJ0fF4OUI/AAAAAAAAA2k/1dfI5Vp6XkE/s1600/delicious.png' width='32'/></a> <a class='addthis_button_facebook'><img alt='Facebook' height='32' src='http://1.bp.blogspot.com/-GpYwvZxzuzU/TXSJ0qKwUlI/AAAAAAAAA20/UiLh_RsGsqY/s1600/facebook.png' width='32'/></a> <a class='addthis_button_digg'><img alt='Digg' height='32' src='http://1.bp.blogspot.com/-JVB0CPHCL1E/TXSJ0ceJsgI/AAAAAAAAA2s/kpyRlPsGJek/s1600/digg.png' width='32'/></a> <a class='addthis_button_stumbleupon'><img alt='Stumbleupon' height='32' src='http://3.bp.blogspot.com/-7-xCrO8HzH8/TXSLJ2054hI/AAAAAAAAA3M/lV4L-SpptZ0/s1600/stumbleupon.png' width='32'/></a> <a class='addthis_button_favorites'><img alt='Favorites' height='32' src='http://3.bp.blogspot.com/-le322tlJxbk/TXSJ0tmqaiI/AAAAAAAAA28/qDly1cnZiIk/s1600/favorites.png' width='32'/></a> <a class='addthis_button_more'><img alt='More' height='32' src='http://1.bp.blogspot.com/-DqjDPRVJc5g/TXSJ04YfobI/AAAAAAAAA3E/7HVFTgWb1dE/s1600/more.png' width='32'/></a> </div> <script src='http://s7.addthis.com/js/250/addthis_widget.js' type='text/javascript'/> </div> </div> <div style='clear:both;'/></script></div></div>
5) Click on Save button. Now you got that widget in your blog.
You can add this widget anywhere you want. Choose the buttons of your favourite social networking sites. Your visitors will definitely share your post if they like your posts.
Here in my blog, you can find some different widgets too for social media sharing.
Subscribe to:
Posts (Atom)