How To Remove Blogger Navbar
In my last post, I had explained how you can create your blog in blogger. To read the post, click the link How To Create A Blog In Blogger. If you have created your blog in Blogger then by default a navbar comes with it that appears in the top position of your blog. Many of you don't like it and want to remove this navbar from your blog completely. It gives an awkward and irritating look to your blog.

Are you feeling very uneasy because of this navbar appearing in your blog? Are you searching for a solution to remove this navbar completely from your Blogger blog? Then you are in the right place my friend.
This tutorial will guide you to complete steps so that you can remove this navbar completely from your Blogger blog. Don't think that this is gonna be a very complicated process and you are gonna mess up with your blog while doing it. This is a very easy process. So you don't have to worry about it. You don't have to go to Edit HTML section for achieving it. You just have to paste a simple CSS code to achieve it.
Steps To Remove Blogger Navbar:-->
1) Log in to your blogger account.
2) Go to your Blogger admin page>Template>Click on Customize

3) Go to Advance>Add CSS
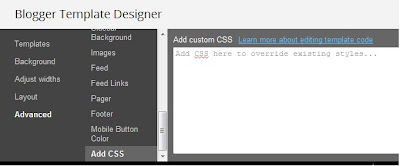
.
4) Paste the following code in the Add custom CSS field and click on Apply to blog

Thats it, Blogger Navbar has been removed completely from your blog. Refresh your blog to check it. Now I guess you are feeling quite happy with your blog's outlook.
For more Blogger tips and tricks, blog customizations, click on Blogger Tutorials and for blogger widgets, click on Blogger Widgets . Keep visiting my blog for more tips and tricks .
Are you feeling very uneasy because of this navbar appearing in your blog? Are you searching for a solution to remove this navbar completely from your Blogger blog? Then you are in the right place my friend.
This tutorial will guide you to complete steps so that you can remove this navbar completely from your Blogger blog. Don't think that this is gonna be a very complicated process and you are gonna mess up with your blog while doing it. This is a very easy process. So you don't have to worry about it. You don't have to go to Edit HTML section for achieving it. You just have to paste a simple CSS code to achieve it.
Steps To Remove Blogger Navbar:-->
1) Log in to your blogger account.
2) Go to your Blogger admin page>Template>Click on Customize

3) Go to Advance>Add CSS

.
4) Paste the following code in the Add custom CSS field and click on Apply to blog
#navbar-iframe { display: none !important; }

Thats it, Blogger Navbar has been removed completely from your blog. Refresh your blog to check it. Now I guess you are feeling quite happy with your blog's outlook.
For more Blogger tips and tricks, blog customizations, click on Blogger Tutorials and for blogger widgets, click on Blogger Widgets . Keep visiting my blog for more tips and tricks .
Subscribe to:
Post Comments (Atom)
No comments:
Post a Comment